



Custom Round Tarps:How to Measure Diameter, Side Drop and Attachment Points
Measure the circular area, define the fabric beyond it, and locate every fixing. This guide helps industrial buyers and OEM teams prepare a drawing for a flat circular tarp or a fitted round cover. DERFLEX supplies tarp materials and drawing-based finished covers. Send the dimensions, application photos and quantity to start a quotation.
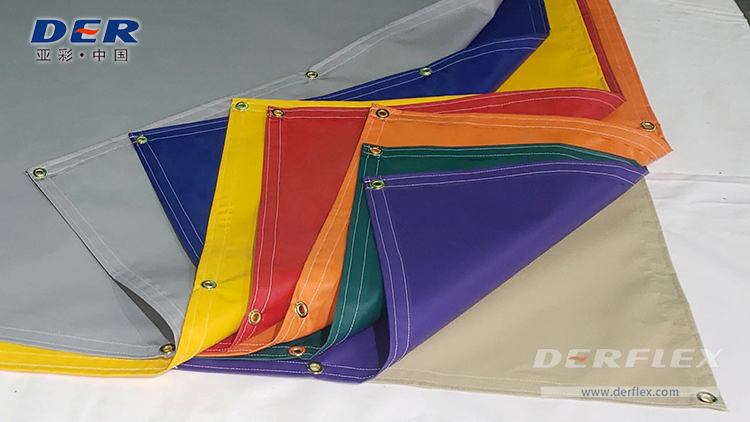
DERFLEX material and finishing reference. These samples show rectangular edges; the circular layouts below are schematics.
A flat circle and a fitted round cover need different drawings.
For a flat surface, measure the diameter through the center and add the required radial overlap on both sides. For a raised object, record the top profile, vertical drop and fittings separately before choosing a pattern.
Flat circular sheet
Suitable as a geometry for a circular footprint with a specified overlap. A larger flat disk can also drape over an object, but surplus fabric gathers around the sides. Increasing the diameter does not create a tailored cylindrical skirt.
For product and material directions, see DERFLEX round tarp options.
Fitted top with side skirt
Use a top view plus a side view for a close-fitting round object. Identify internal clearance, taper, access openings and the skirt closure. The factory develops cutting and seam allowances from the agreed finished dimensions.
For this construction, compare fitted cylinder tarp covers.
Use one datum, one unit and the actual installed shape.
Measure the object in the condition in which it will be covered. Include handles, rims and fixed projections in the drawing rather than relying only on a nominal tank or equipment diameter.
Check the diameter in several directions.
Measure straight across through the center, then repeat at 90° and at another angle where practical. Record the measured values and orientation. If they differ, show both axes and the local protrusions; an oval rim or distorted frame needs more than one diameter.
Separate overlap, drop and tying reach.
Overlap is extra radial coverage beyond a flat footprint. Drop is vertical coverage below a defined top datum. Tying reach is the connection from the eyelet or strap to its anchor. Record each separately so the same allowance is not added twice.
Trace any raised or curved profile.
For a domed top or mound, measure the supported surface path across the intended cover line. Include the rise and rim shape in a side view. Horizontal diameter alone understates the travel over a raised center; a flexible tape along the profile still does not define the complete flat cutting pattern.
Write “finished dimensions” on the drawing.
Specify the measurement condition and agreed tolerances. For a sheet, use the outside finished edge. For a fitted cover, define the internal fit or seam reference explicitly. Do not subtract an assumed hem width from your coverage requirement.
For general size terminology, read the tarp size and measurement guide.
Two examples, two different specifications.
Df = Do + 2O
2,400 + 2 × 200 = 2,800 mmIllustrative dimensions: a level Ø2,400 mm area with 200 mm overlap all around needs a Ø2,800 mm finished flat sheet, before any separate design changes.
Object Ø = 2,400 mm
Desired finished side drop = 300 mmA simple across-top-and-down-both-sides path is 3,000 mm. This is a drape planning dimension, not an approved circular blank or fitted-cover diameter. For a fitted cover, submit Ø2,400 mm and H300 mm separately, then agree the fit clearance.
A correct diameter can still leave the eyelets in the wrong place.
Dimension the centers of grommets, D-rings or tabs against a fixed orientation. Existing anchors should determine the map; a regular spacing pattern is only appropriate when the installation supports it.
- Start with a permanent reference.Use a labeled fitting, access seam or marked centerline as 12 o’clock. State “top view, clockwise,” and mark which face is outside.
- Dimension the eyelet center circle.If the finished sheet diameter is Df and each center is inset e from the outer edge, the eyelet circle diameter is Dg = Df − 2e. Draw the hem width and hole size separately.
- Choose equal spacing or an anchor schedule.For evenly spaced points, identify count N and starting angle. For irregular anchors, list each point’s angle and radial distance from the same center, or use a dimensioned coordinate map.
- Account for the load path.Map the anchor’s height, pull direction and connection length. Hole count alone does not establish wind capacity or eyelet pull-out resistance.
Review reinforced grommet tarp construction alongside the dimensions.
Worked geometry example only. On a small screen, scroll the table horizontally.
| For Dg = 2,000 mm and N = 12 | Relationship | Approximate result |
|---|---|---|
| Angular interval | 360° ÷ N | 30° |
| Arc pitch between centers | π × Dg ÷ N | 523.6 mm along the circle |
| Straight center-to-center chord | Dg × sin(180° ÷ N) | 517.6 mm across the gap |
These are different measurements of the same layout. Neither value is a recommended safe pitch. A fixed anchor pattern, openings or a seam interruption can require a nonuniform arrangement.
Flat-sheet diameter and eyelet spacing planner.
Use this tool for a level circular footprint with equal radial overlap and evenly spaced eyelets. Inputs are planning choices, not DERFLEX standard dimensions or a load recommendation. Side drops and fitted skirts need a separate drawing.
Illustrative planning result
- Finished flat-sheet diameter
- 2,800 mm
- Eyelet center circle diameter
- 2,720 mm
- Planning point count
- 18
- Equal angular interval
- 20°
- Resulting arc pitch
- 474.7 mm
- Straight chord between centers
- 472.3 mm
N = ceiling(π × Dg ÷ target pitch), with a minimum of 3 points for plotting. Confirm the final anchor map, hem geometry and attachment performance separately.
Confirm the material, perimeter and panel plan together.
DERFLEX can discuss PVC coated polyester roll goods, cut panels and custom finished tarps. State whether you need fabric for local fabrication or a completed circular cover. Anchors, supporting frames and installation work need an explicit scope agreement.
- Choose the fabric by the duty.Define rain exposure, handling, abrasion, temperature and storage conditions. A solid coated fabric and a mesh solve different tasks. GSM or thickness alone does not establish the strength of the finished edge.
- Review seams before approving a large circle.Usable roll width and the required diameter affect panel joins. Put the proposed seam locations on the drawing and identify sealing requirements, wear zones and any seams near fixings.
- Specify reinforcement at the actual load points.Agree the hem construction, compatible webbing or patches, eyelet hole size and hardware material. A rectangular corner sample illustrates construction only; a circular perimeter needs its own approved detail.
- Define access and runoff.Locate the opening, zipper or split against the same datum as the eyelets. Plan support and slope so water does not collect. A flat waterproof sheet does not create a self-draining roof.
For hardware comparisons, see the grommet and D-ring selection guide. For supply formats, see custom tarp manufacturing options.
Send a top view, a side view and an attachment schedule.
A labeled hand sketch is a useful starting point. Include photographs with a measuring reference where the shape or installation is difficult to describe.
Quotation and drawing checklist. Scroll horizontally on smaller screens.
| Drawing item | Record this | Resolve before production |
|---|---|---|
| Cover identity | Flat circular sheet, loose drape or fitted round cover; quantity and application | Fabric rolls, cut panel or completed cover; accessories included in the quote |
| Object geometry | Measured diameters, rim, rise, taper and projections; same unit throughout | The controlling dimensions and any fit clearance |
| Finished dimensions | Outside sheet diameter, or fitted top datum and finished skirt drop | Tolerances, measurement method and relaxed measurement condition |
| Attachment map | Datum, outside face, numbering direction, point count and center positions | Arc or chord convention, inset, hole size, pull direction and anchor alignment |
| Construction & access | Hem, reinforcement, seam zones, splits and openings | Sealing, abrasion pads, drain path and necessary ventilation |
| Order & evidence | Color, quantity by size, destination, packing and requested documents | Selected material data, sample approval, lead time and acceptance criteria |
Check the first finished sample.
- Lay a flat sheet relaxed on a suitable flat surface; do not stretch it to meet the drawing. Measure several diameters and the eyelet center inset.
- Check point 01 and the numbering direction against the drawing. Inspect the centers of each critical fixing, not only the overall diameter.
- Trial-fit a fitted cover on the intended object. Check the top fit, drop, closure, access, ventilation and clearance at projections.
- Review the agreed seam and edge details. Record the approved drawing revision and sample identity for repeat orders.
Quote comparisons should use the same finished geometry, material, panel construction and hardware. Fabric utilization, seam length, reinforcement, packing and order quantity can all change the cost.
Custom round tarp measurement FAQ.
Should I give the object diameter or the finished tarp diameter?
Give both and label them. Object diameter describes what needs covering; finished tarp diameter describes the outside edge of a completed flat sheet. If you only know the object size, add the desired overlap or drop as a separate requirement and let the cover construction be agreed before production.
How much extra should I add to a round tarp?
There is no universal extra amount. A flat footprint needs the intended radial overlap; a drape needs surface travel and a fastening plan. A fitted cover needs defined fit clearance and skirt dimensions. Record the purpose of each allowance rather than adding a generic margin.
Can I measure circumference instead of diameter?
For a truly circular rim, diameter equals circumference divided by π. Use a consistent measuring line and check the result against direct measurements where possible. The same circumference can describe a distorted or oval outline, so circumference alone does not prove a circular fit.
Should eyelet spacing be measured around the edge or straight across?
Specify the convention. Arc pitch follows the circle through the eyelet centers; chord spacing is the straight distance between adjacent centers. Also state the eyelet center inset from the finished edge. The outside hem circumference and the eyelet center-circle circumference are different.
Can a larger flat circle replace a cover with a side skirt?
It may provide loose draped coverage, but the excess perimeter gathers around the object. A fitted side skirt controls the vertical shape and closure more directly. Choose the construction based on the required fit, access, drainage and fastening arrangement, then confirm it with a trial fit.
Do more eyelets automatically make a circular tarp safer in wind?
No. The material, reinforced edge, attachment strength, anchors, pull directions, support and exposure work together. Additional points help only when the installation uses them appropriately. A geometric spacing calculation cannot verify wind capacity or replace an assessment of the complete installation.
Make the next drawing easier to approve.
Send DERFLEX the object size, cover type, overlap or drop, anchor photos and order quantity. A clear dimension set helps align the material, finished shape and perimeter detail before a sample or production order.
Your starting pack
Top view + side view · Measured dimensions and units · Attachment datum and point map · Application photos · Quantity and destination
Request a Quote