


 COATED FABRICS
OUTDOOR SHELTER PROGRAMS
Waterproof Tarp Shelters for Camping
Create a rain shelter around the space campers actually need. DERFLEX supports custom camping tarp programs for outdoor brands, distributors and campsite buyers, from coated fabric and cut panels to finished tarps. Start with your pitch, protected footprint and carrying-weight target; then define the seams, reinforcement and attachment points that make that shelter usable.
Material, finished tarp and accessory scope are confirmed separately. No stock size, wind rating or complete frame package is implied.
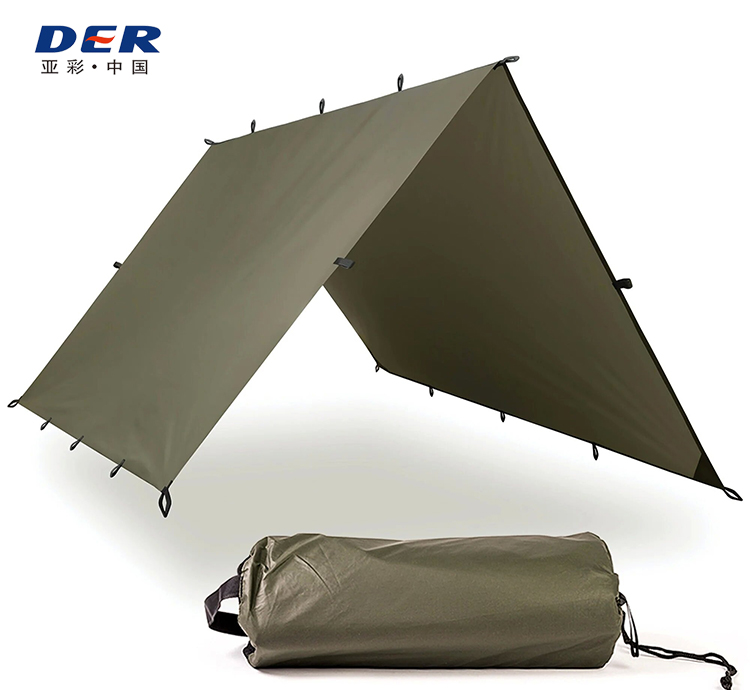
A waterproof sheet becomes a shelter through its construction and pitch
A waterproof camping tarp shelter combines a water-blocking fabric, sealed seams, reinforced fixing points and a roof slope that drains. Flat dimensions alone do not describe the dry space beneath it. Ridge height, eave position, open ends, wind-driven rain and the user's sleeping or seating height all change the coverage.
A useful specification separates three questions: does water pass through the fabric; does it pass through the finished seams and attachments; and can rain enter around the shelter? Improving one does not automatically solve the other two. A larger sheet can still leave occupants exposed if it is pitched too high or faces the wrong direction.
This page focuses on overhead rain shelters for ground camping, family camps and vehicle-supported basecamps. For the broader range of footprints, gear covers and supply formats, see DERFLEX camping tarpaulins.
Choose a pitch before ordering a flat size
Use the intended setup as the starting drawing. Record the ridge direction, access opening and drainage edges, then place attachment points where those loads will actually enter the tarp.
On smaller screens, swipe the comparison table horizontally.
| Shelter layout | Useful for | Specify first | Coverage trade-off |
|---|---|---|---|
| A-frame | Ground sleeping zones and a defined two-slope roof. | Ridge length, ground span, ridge/eave heights and ridge-end reinforcement. | Lower eaves reduce side exposure but also reduce access and usable headroom. |
| Lean-to | A sheltered rest area with a wide open front. | High edge, low edge, roof slope and the exposure of the opening. | Open access provides limited protection when rain blows toward the front. |
| Raised dining fly | Seating and shared camp living space. | Standing clearance, supported high points and clear runoff paths. | A high roof exposes more of the occupied area to angled rain. |
| Hammock cover | Overhead protection above an occupied hammock. | Ridge reach, suspension clearance and end coverage. | The hammock position and suspension paths restrict where the roof can close. |
For hammock-specific shapes and coverage questions, compare the hammock tarp development options. Avoid selecting a person count from area alone: seating, sleeping and standing layouts use the same floor area differently.
Turn your protected footprint into finished tarp dimensions
For a symmetric A-frame with straight, taut roof panels, measure the horizontal ground span W and the vertical rise R from the eaves to the ridge. The roof uses material along its slopes, so a tarp's flat width is greater than the horizontal span it covers.
R = ridge height − eave height
A 2.4 m span needs more than 2.4 m of fabric
With a 1.6 m ridge and 0.6 m eaves, R is 1.0 m. Each slope is √(1.2² + 1.0²), or about 1.56 m. The two slopes therefore need approximately 3.12 m of usable roof width.
This is a geometric starting point, not an available SKU or guaranteed dry footprint. End exposure, installation tension and finishing allowances still need review.
Specify finished size and protected space separately
Mark the minimum usable roof width, ridge length, access ends and all tie-outs on the drawing. State whether dimensions refer to the finished tarp measured flat and relaxed or to installed distances.
The fabricator calculates cut sizes and hem or seam consumption. Do not add a guessed allowance and describe that as guaranteed coverage.
For covers that wrap around equipment or use a different profile, consult the tarp sizing and finished-dimension guide.
Choose a fabric construction for the way the shelter travels
Carrying weight is a design constraint, not a quality ranking. Backpacking, car camping and a repeatedly handled basecamp roof need different balances of packability, abrasion resistance, repair method and cost.
Carry-conscious shelter programs
Define the maximum finished tarp weight and packed dimensions before discussing fabric. Review a lightweight coated textile, its seam-sealing method and the reinforcement required at the selected tie-outs.
Metal fittings, extra panels and oversized patches add weight too. The useful comparison is the completed shelter tarp with the same coverage and included items.
See the rain fly tarp material and construction directions for compact outdoor product development.
Vehicle-supported and repeated-use roofs
Selected PVC-coated polyester constructions are worth reviewing when weldable panels, surface cleaning and frequent handling are priorities. Compare the handling sample and packed bulk against the people who will set it up.
Do not assume a heavy industrial tarp is suitable for a hiking pack. Material choice must still fit the shelter geometry and the target finished weight.
Review the PVC tarpaulin material family before setting a particular grade.
Compare like with like. GSM describes mass per unit area; thickness describes a different property. Neither alone proves waterproofness, tear resistance or service life. A waterproof-pressure result also needs its method, specimen condition and fabric identity.
For early weight planning, fabric mass in kilograms equals flat area in square metres multiplied by GSM and divided by 1,000. This excludes hems, overlaps, fittings, reinforcement, lines and the bag. Use the calculation to set a development budget, then weigh the finished approval sample.
Seams and tie-outs deserve the same attention as the fabric
Match the seam to the coating
Welding can join compatible coated constructions; sewn products need a sealing approach compatible with their coating and intended use. A sealant or tape that adheres to one surface may not suit another.
Review seam placement near the ridge, lap direction and every stitched reinforcement that penetrates the roof. Inspect an actual joint made with the proposed material rather than accepting a fabric-only waterproof claim.
Reinforce the planned pulling directions
Label ridge, corner and side pull-outs on the drawing. Agree the patch shape, edge structure and interface: a webbing loop, eyelet or another suitable detail. The line should pull into a reinforced zone without rubbing a sharp edge.
More attachment points add options only when the material and reinforcement support the intended pitch. A tie-out count is not a wind rating.
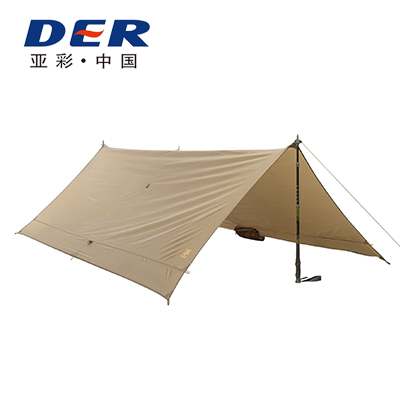
Review the whole route to the anchor
Check the tarp attachment, connector, guy line, tension adjuster, pole or ridgeline and ground anchor together. A robust sheet cannot compensate for an unsuitable anchor or a line that abrades its edge.
Use balanced tension to establish drainage without pulling one corner excessively. Recheck the pitch after the material settles or becomes wet. The tarp tie-down guide explains attachment and tensioning considerations.
System boundary: material strength, seam strength and the stability of an installed shelter are different questions. No structural or wind-load rating is stated for the displays on this page.
A shelter-specific specification makes quotations comparable
Use one revision of the drawing and bill of included items for every quotation. A low fabric price can be misleading if one offer excludes reinforcement, seam sealing, bags or accessories.
| Field | Put in the enquiry | Confirm before production |
|---|---|---|
| Application & pitch | Backpacking, family camping or basecamp; pitch sketch and exposure. | Intended setup, supported points and operating instructions. |
| Finished dimensions | Flat length/width, installed span and ridge/eave heights. | Measurement condition, tolerance and any minimum usable dimensions. |
| Material & handling | Construction preference, finished-weight target, colour and packed volume. | Identified material, approved reference sample and agreed tolerances. |
| Waterproof construction | Rain exposure, seam layout and any requested test method. | Fabric evidence and a separate check of finished seams and penetration details. |
| Attachments | Positions referenced from a drawing datum; interface type. | Patch details, fitting orientation and the agreed inspection or test procedure. |
| Supply & packing | Rolls, cut panels or finished tarps; quantity, labels, bags and destination. | Included parts, carton contents, packing sample and quotation terms. |
Fabric selection, roll-width utilisation, panel joins, number of reinforced attachments, branding, packaging and order mix all affect cost. Ask DERFLEX to quote the same approved scope across size variants. MOQ, sample charges and lead time belong in the project quotation rather than being assumed from another product.
Have a sketch rather than a technical drawing?
Send the setup you want to achieve, the approximate sheltered area and your order quantity. These provide a useful starting point for defining the finished tarp.
Discuss Your Shelter DrawingCheck the sample in the pitch it will be sold for
A flat inspection cannot reveal every issue in a pitched shelter. Agree the sample procedure before production and retain the approved drawing and sample identification for repeat orders.
Measure and identify
Record relaxed finished dimensions, mass, colour, material identity and tie-out positions. Photograph both faces, seams and reinforcement details. Compare these with the agreed drawing revision.
Pitch and inspect runoff
Set the intended ridge and eave heights. Check standing or sleeping clearance, side access, edge tension and pockets where water could collect. Confirm that runoff leaves the occupied area.
Separate leakage from entry
Agree a practical water check and observe fabric, joints and attachment penetrations separately. Record where water appears; an open-end splash is a different issue from a leaking seam. A demonstration does not replace an agreed laboratory test.
Pack the complete product
Confirm the supplied parts, folded dimensions, bag fit and instructions. Inspect attachments again after the agreed handling trial. Resolve findings before using the sample as the bulk-order reference.
Plan drainage, ventilation and storage from the start
Drainage: establish a stable slope and avoid unsupported depressions. Keep drip edges beyond the protected sleeping or seating zone. Arrange the site so runoff does not flow back underneath the shelter; an overhead tarp does not stop ground water.
Ventilation: moisture on the underside can be condensation rather than rain leaking through. Keep suitable airflow and clearance between the roof and inner equipment. A more enclosed pitch changes both ventilation and access.
Exposure: choose a site and anchors suitable for the conditions. Keep the tarp clear of sharp branches and abrasive supports. Plan to lower or remove it when conditions exceed the shelter arrangement's safe use; do not infer a storm rating from fabric weight.
Heat and care: keep the tarp clear of flames, hot equipment and exhausts. Request material-specific cleaning instructions, remove grit before packing and dry the tarp before extended storage. Flame-retardant treatment, when specified and documented, does not make a shelter fireproof.
Waterproof camping tarp shelter FAQ
What makes a camping tarp shelter waterproof?
An intact waterproof fabric is only the starting point. The finished roof also needs compatible seam sealing, sound reinforcement details and a sloping pitch that drains. Open ends and sides can still admit wind-driven rain, so define the protected area separately from the flat tarp size.
Is PVC tarpaulin suitable for a camping shelter?
Selected PVC-coated polyester constructions can suit vehicle-supported camps, repeated-use covers and larger shelter panels where weldability and handling durability matter. For backpacking, compare actual finished weight and packed volume with a lightweight coated-textile alternative. Choose a construction by the intended use rather than assuming that heavier is always better.
What size tarp do I need for an A-frame shelter?
Measure the required ground span, ridge height, eave height and ridge length. For a symmetric straight-sided roof, the usable width over both slopes is twice the square root of half-span squared plus ridge-to-eave rise squared. Add project-specific end coverage and confirm the finished dimensions and fabrication allowances on the drawing.
Can one shelter tarp be used for hammocks and ground camping?
A rectangular tarp may support both uses if its length, side coverage and attachment layout fit each pitch. Check coverage beyond the occupied hammock and check usable headroom for ground camping. A shared flat size does not guarantee equal rain protection in both configurations.
Are poles, pegs and guy lines included?
The quotation should identify every included item. DERFLEX can discuss material rolls, cut panels and finished tarp programs; support poles, pegs, ropes and packing accessories must be specified and confirmed individually. A tarp quotation should not be treated as an engineered frame or installation package.
What should I send for a custom camping shelter tarp quotation?
Send a pitch sketch or reference photo, required finished length and width, ridge and eave heights, intended use, quantity, destination and packing needs. Add tie-out positions, a finished-weight target and any required test documentation if available. A rough sketch is enough to start the specification discussion.